Tuesday, August 14, 2012

The Doctor is in...well, at least for a bit


I found a few moments today to work with a few of my 'patients'.  The last time I worked on my little English Wax Fashion doll, I had completed work on the head, restoring it to much of its former beauty. 


At that time I had not yet begun to work on the body or the clothing.  There was really little to do on the body other than to find and add a pair of arms.  The clothing needed a good wash, which was accomplished first with Orvus and then a product I love called Re-store.  Re-store was created for quilters and meant to take the yellowing out of old delicate textiles.  It works wonders on antique doll clothes and is completely safe and very gentle.  I also tackled cleaning her shoes.  I think there is enough there to restore them so she can wear the originals, but that is a job for another day. 


 Recently on EBay I made contact with a lovely seller named Lynda Randle.  Her EBay seller ID is lyndalou4u.  She used to work in a doll hospital and she makes lovely replacement leather arms for dolls.  I purchased a pair for a very reasonable price on EBay and when I checked, found they were perfect for the wax fashion doll.  If you are looking for leather arms for one of your dolls, please check her work out on EBay.  You can see the arms in the photo of the doll below.  (And yes, those are the same clothes as shown above!)


Her dress is on the way.  I purchased it on Ruby Lane and will share the completed doll with you as soon as it arrives and she has donned her walking suit. 

Here is an update on my Gallimufry girl.  I baked her a bit more today to remove the old wax.  Her charm is starting to shine through.  Check back for more soon as I begin to restore this lovely little girl.


Monday, August 13, 2012

Gallimaufry girl


Gallimaufry is one of my favorite words.  It means a hodge podge of disparate parts.  Boy, does this little doll fit the bill!  Today I am sharing my newest 'buy'.  I call her 'blue boots' because that is what first attracted me to the doll and the EBay sale.  Interestingly enough she was billed as a very old French doll, which, she is not.  As you can see by her head, she is a typical Alice In Wonderland style wax-over papier mache that would most likely be German.  It is the standard papier mache, painted a brilliant pink, and then waxed over with a flesh tinted wax.  Alas, somewhere in the decades that have passed she was apparently shoved in a yellow mud puddle and then freeze dried or baked! 


Another thing that happened over the decades is that somehow, somewhere, this wax over papier mache head was 'wedded' with several other doll parts.  I bought the doll for the blue booted feet and at the time wondered about the jointed hand/arm combo.  It seemed out of place.  Once  I got a good look at the doll, I saw the hands and upper arms were definitely replacements and completely inappropriate for the body (if nothing else, they are way too big).  I would imagine these hands were from a bisque headed doll of some sort, though they could have belonged to a papier mache - just not this one.


As I began to pull the doll apart, removing the clothing, it quickly became apparent that the head had been wedded not only to the arms, but to the body as well.  The head might be the right type, but it is too large a size for the torso and was tied on - not very well, I might add - with strings.

The body is definitely older as the leg/shoe combinations are wood.  They are beautifully turned and painted with high detail.  These are the kind of shoe boots that are often found on early 19th century dolls and this little head is late 19th.  I have seen them on these old papier maches and on milliners models.  The length of the doll measured 11 inches when I got it.  The size of the body suggests the original doll might have been smaller, more like 10 inches.  Many milliners models were this size or smaller.  I think, though, that the legs also may have belonged to a papier mache head, but again, not this one.


The clothing is simple and in the usual style for a German doll head of this type.  The dress, unfortunately, is a shattered silk mess.  You can see the original design in the photo below.  It appears to have been an off-white silk with a green circular design.  The bodice of the dress is lined, so some time was taken in the making, which suggests the original owner might have been a 'well heeled' dolly.  (Pun entirely intended!)


I am not entirely sure what I will do with this little girl.  I doubt the arms will stay.  Though some mother long ago probably played 'doctor' and saved her little one's friend with great ingenuity, I will most likely rework the entire thing.  I will replace the composition arm/hands with leather ones, which are more appropriate, and probably look for a wonderful little head.  I actually bought this doll to use the body and arms for another head.  Keep checking back to see how this project progresses.  At the moment, it is a mystery to me!

As to my other 'patients', they are in the waiting room at the moment until the doctor returns.  We are at the end of the summer season at the historic site where I work and there never seems to be time to play with dolls.  Hopefully, I will have some updates soon.

Tuesday, July 10, 2012

Wax Dolls Part Two


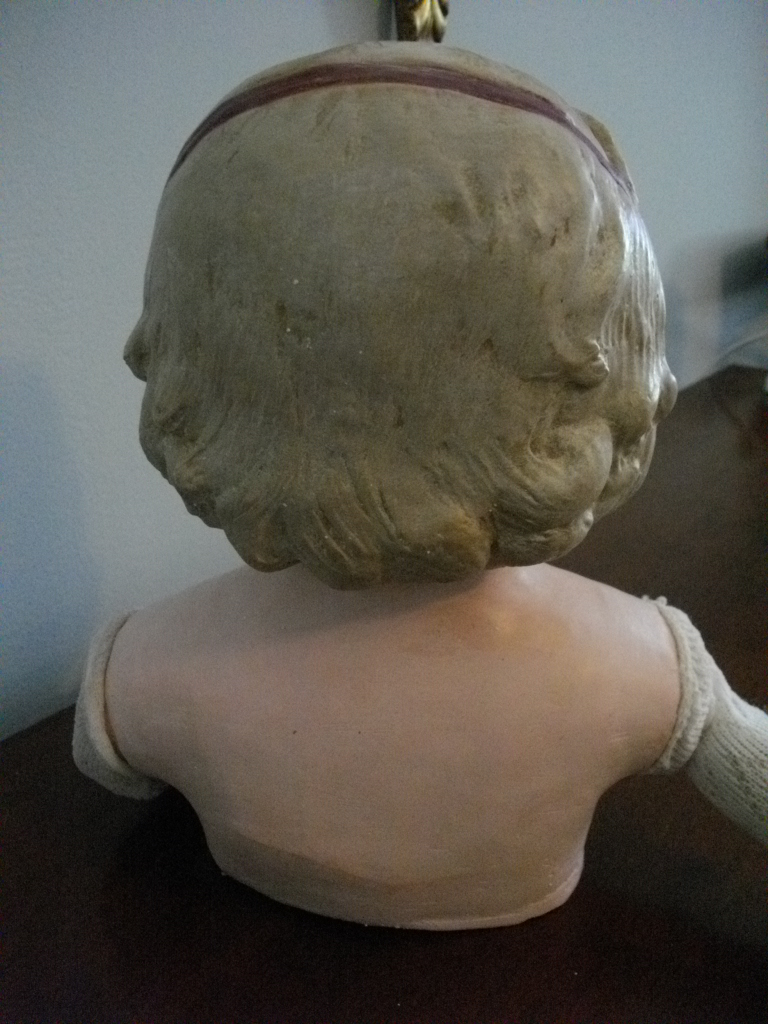
Found the time to work on the hair and head of the wax fashion doll today.  The hair was an interesting project that evolved as I worked.  Though the photos of the wax head make it appear there was a good bit of hair at the forehead line, there was really very little.  When I pulled it away, there were thin strands - app. 1/4 inch wide - and they did not really cover the head beneath.  All of the hair had been incised originally as I thought, so there was no wig or wig cap.  Once I had separated out the strands, I bravely opened the lighter fluid, poured out a small measure, and went to work.

The lighter fluid did 'dry clean' the hair, brightening it a bit, though very little dirt actually came out.  I was careful not to get it on the head.  Still a bit bled up into the scalp and some of the incised hair came loose, but that was okay as I had intended to do that anyhow in order to re-position what remained of the original hair. Once I realized how little hair there actually was, I decided to do a Grecian style bun rather than let the hair hang down loose, so the main thing I needed to do was add some additional mohair to pad out the 'do.


At first I considered dying the newer mohair to match the old - which would have worked - but I decided to use the lighter tone as a base and then pull the older over and work it into it.  In doing so I would create multi-toned hair that, to me, would look more realistic.  I pulled the old hair down into a sort of crown and then began to insert and, at times, glue the new mohair to the head in order to fill out the crown area.  Once that was done, I worked it into a bun.


When the bun was finished and pinned in place I put a net over it for good measure and then set about applying the original braids.  One was still attached and in place, but the other was damaged at the top and loose.  After careful study, I decided to remove the loose braid and then to apply it and the other braid over the forehead area to hide the work I had done on the scalp while applying the new and old loose hair.  Then I added a few flowers to hide the edges of the net and -voila!  Looking at the finished product, I really like the mixed tone hair.


After finishing the hair, I moved on to inserting the eyes.  The doll's eyes fell out in transit from the seller and one snapped off the rocker.  I had already glued those.  When I went to inset them, the old plaster would not allow the eyes to fit.  Again, after study, I decided not to remove the old plaster (the wax is very thin around the eye sockets).  Instead, I scraped away at the plaster until the eyes would fit, got them in place, and then simply stuffed the head to hold them there.  Someday I may attempt to set them to rock, but that is not a priority now.


Once the eyes were in place, I worked on the features, adding a ring of brown around each eye socket.  I have studied many wax dolls and this seems to be a constant.  I then painted the lips, added a touch of lip color to each nostril and corner of the eye, and then finished it off with a pair of delicate brown brows.  I am always amazed when I restore these old dolls.  I never know what their personality is going to be until they are completed.  This one doesn't want to smile and seems a bit coy!


Well, there you have it for phase two.  Phase three will be to put the head on the body and attach the new arms.  Then comes the costume.  Now that her hair is done, I think she is definitely a fashion lady.  I'll have to use that dress on some other faded beauty.....

Oh, by the way, I couldn't find any Woolite to clean the doll head.  I got to thinking and decided to try to Orvus I have that I use to clean antique textiles.  I used a VERY old, VERY worn 3M scratcher to apply the cleaner to the wax 'skin'.  After first wetting the scratcher, I put a tiny bit of the Orvus cream on it and gently scrubbed. You can see the result!  It worked wonderfully, leaving even the soft original layer of what I believe is paint intact.

You learn something every day....


Wax dolls


Ah, yes, one of the loves of my doll collecting life - but WAY out of my price range.  Until the internet, that is.  Of course, it's fortunate that I can repair dolls too....


Here is my most recent acquisition.  I purchased this little beauty on layaway from a very kind and helpful doll dealer named Carla on Ruby Lane.  Go to www.rubylane.com and check out her shop 'Oldeclectics'.  She has the most wonderful dolls, at reasonable prices, and is just a sweety.  

This wax or wax over (which I believe she is, though the wax coating is very thick and makes her appear to be a poured wax) is a fashion doll.  (Note the tiny waist.)  I am not certain yet whether she was meant to be a lady fashion or a child fashion doll.  More study is indicated.  At the moment I am going to dress her as an older child, say around 12 or so.  (And yes, the child fashion dolls had that teeny, tiny waist like their corset-wearing mommies.)  


She looks a bit like something out of a horror movie right now.  At least, that is what my granddaughter tells me!  The doll has sleep eyes, which came loose in transport and will have to be reset, and as you can see - no arms.  I purchase a china head body on EBay (sans head).  It had a lovely pair of leather arms, and I will eventually act like Dr. Frankenstein and take parts from both and put them together. Her body is finely made.  It is weighted so she can sit and pretty clean for its age, so it will require little work.  She even came with her little linen shoes that I am going to attempt to restore.  


 Her hair is going to be a challenge.  It is incised, or pressed into the wax and not a wig, and the original wired braids that went around the sides are still intact (if filthy!).  This is an indicator that this was a fine, more expensive doll such as those made bu English firms like Pierotti and Montonari, as the maker would not take the time to press the hair in unless they were going to make more money.  (Think today's retail!)  This is a wonderful thing - except it means that I have to clean the hair on the head!  You clean old mohair with lighter fluid or paint thinner.  Now, think about that - lighter fluid on a wax or wax covered head.  Yep, you can see the dilemma.  I know how I am going to tackle it and will document as I go along so you can see whether or not it works! 


Then, of course, the head itself has to be cleaned.  I have done some research on this and where one restoration artist swears by non-acetone nail polish cleaner, another shouts 'Don't use that!'  Woolite is recommended by one and nixed by another.  So is cold cream.   Hmmmm...we'll see.

Anyhow, enjoy the 'before' pictures.  Hopefully I will post some of the 'after' soon.  I am dying to have her completely restored!

Monday, May 28, 2012

Miss Dolly and her re-do

I give doll talks and my subject matter is '100 years of childhood'.  In the talks I cover the history of both dolls and the children who loved and played with them from app. 1830 to 1930.  Years ago my doll collection consisted of mostly bisque Bebes.  As I began to do these talks, I found I needed examples of other types and times of dolls.  Over about 5 years I sold some and bought others until I felt I had dolls that hit most of the major important moments in doll history - with a few exceptions.  One exception was that I lacked an American made doll, and specifically, a Schoenhut.  Albert Schoenhut began to produce dolls and toys in 1911. Schoenhut's wooden art dolls were made completely of wood and spring-jointed so they are incredibly lifelike. There are many types and faces, so when I finally decided to get one, I had to make a choice - go with what I liked and buy a character type, or find a 'Miss Dolly'.  I finally opted for Miss Dolly for one reason - she has quite a story to go with her!

During WWI dolls were no longer imported from Germany and little girls in America still wanted dolls.  Albert Schoenhut's character dolls were available, but  - unlike adults - most children did not like them.  They were too realistic.  So the Schoenhut company decided to introduce Miss Dolly, whose face was based on the standard German bisque dolly face little girls loved so much.  In fact, I think she is a direct 'steal' from Armand Marseille's 390.  Miss Dolly actually sold for a higher price than her artistically designed brothers and sisters and was a hit with children everywhere.

Of course, I had to buy a little Miss Dolly who needed the doctor's touch. This example was in good shape with the appropriate scuffs and scrapes to her toes, body, and nose that showed she had been loved.  However, somewhere along the way someone decided she needed some new 'make up' and her wonderful Schoenhut subtlety was completely undone with bold black eyelashes and thick brown brows.  Fortunately her decal eyes were intact and untouched.  


First step, of course, is to remove the wig and see what all needs fixing.  I did have to chip away some old paint, but not too much.  As I have said before, my goal is NOT to make a doll look brand new.  I often preserve some of the marks of time, leaving behind some missing paint, etc.  I hope to have people look at the doll and ask, 'Do you think that was repaired?'  So, for Miss Dolly, I did very little filling, but only repainted a few places and concentrated on her face, first removing the bad feature painting and then, after filling and sanding to take care of the missing top surface on her face, repainting her brows and lips.  I left off any eyelashes, though I may add them later.  Again, in most examples time has worn the lashes away to practically nothing.


Once I had the painting done, then it was time to give her a little 'shine', which I did with a paste wax.  I used to use fixatives, but I rarely do anymore.  They are too shiny for one thing and also, not 'period' correct.  I prefer natural materials whenever I can use them.


And then I get to the fun part!  With the bare slate of a bald head and face above, the doll doctor gets to play, trying on wigs and clothing until they find the 'spirit' of the doll.  This little girl is actually awaiting her future outfit - I haven't found it yet.  For now, I have put her in an aged silk jumper and blouse I bought on EBay.  I like her in it, but it is not really correct for the type as it is more of a lady's than a child's dress.  I chose a brown wig for her after trying several other colors.  From what research I did, brown and blond seem to have been the most common colors.  I may change the hair color with the new clothes - who know? - but for now I think the medium brown mohair suits her well.


Next - Wax dolls and wax over composition

Alice is fit for Wonderland

My papier mache or patent washable type 'Alice' came to me via EBay.  I search the doll items there for needs for clients, but also for dolls that only a mother...or doll doctor could love.  I enjoy rescuing dolls that would seem to most to be hopeless cases.  Alice was certainly one of those!  She arrived with 2/3 of her head missing, but her face intact, a good deal of damage to her breastplate, and no body.  In April's post I showed the first few steps in her restoration, which included repairing her plate, creating a new base 'head', and then sculpting and modeling her missing hair and headband.  The last pictures posted showed Alice with her final skin tone and underpainting for her hair.  I have now completed her and am posting photos of the rest of the process.  She has a new dress on order for the Hatter's tea party that will match her burgundy headband, but for now is wearing a nice white dress with a little black sash (perfect for shrinking and growing in!).  Alice is 28 inches tall and turned out to be a really sweet little girl.
 

In order to age the hair color, I applied a brown and then a white wash over the deep golden hair paint.  The skin tone has not been changed from the previous post.  An appropriate body was obtained from EBay and the head attached.  Alice's features were created with a mixture of paint and professional colored pencils.  I find the pencils work best for eyebrows and lashes.  I used photos of several similar dolls from this period to base the features on.  I did not add lashes to Alice as I noted that most of the dolls did not have them, or had lost them to time.  My aim is to make the dolls look as original as possible and, if possible, to maintain an illusion of age even though I have just freshly painted and completed them.  No 19th century doll should look brand new!


Next post - Miss Dolly gets a re-do.