Friday, February 28, 2014

Great little Greiner


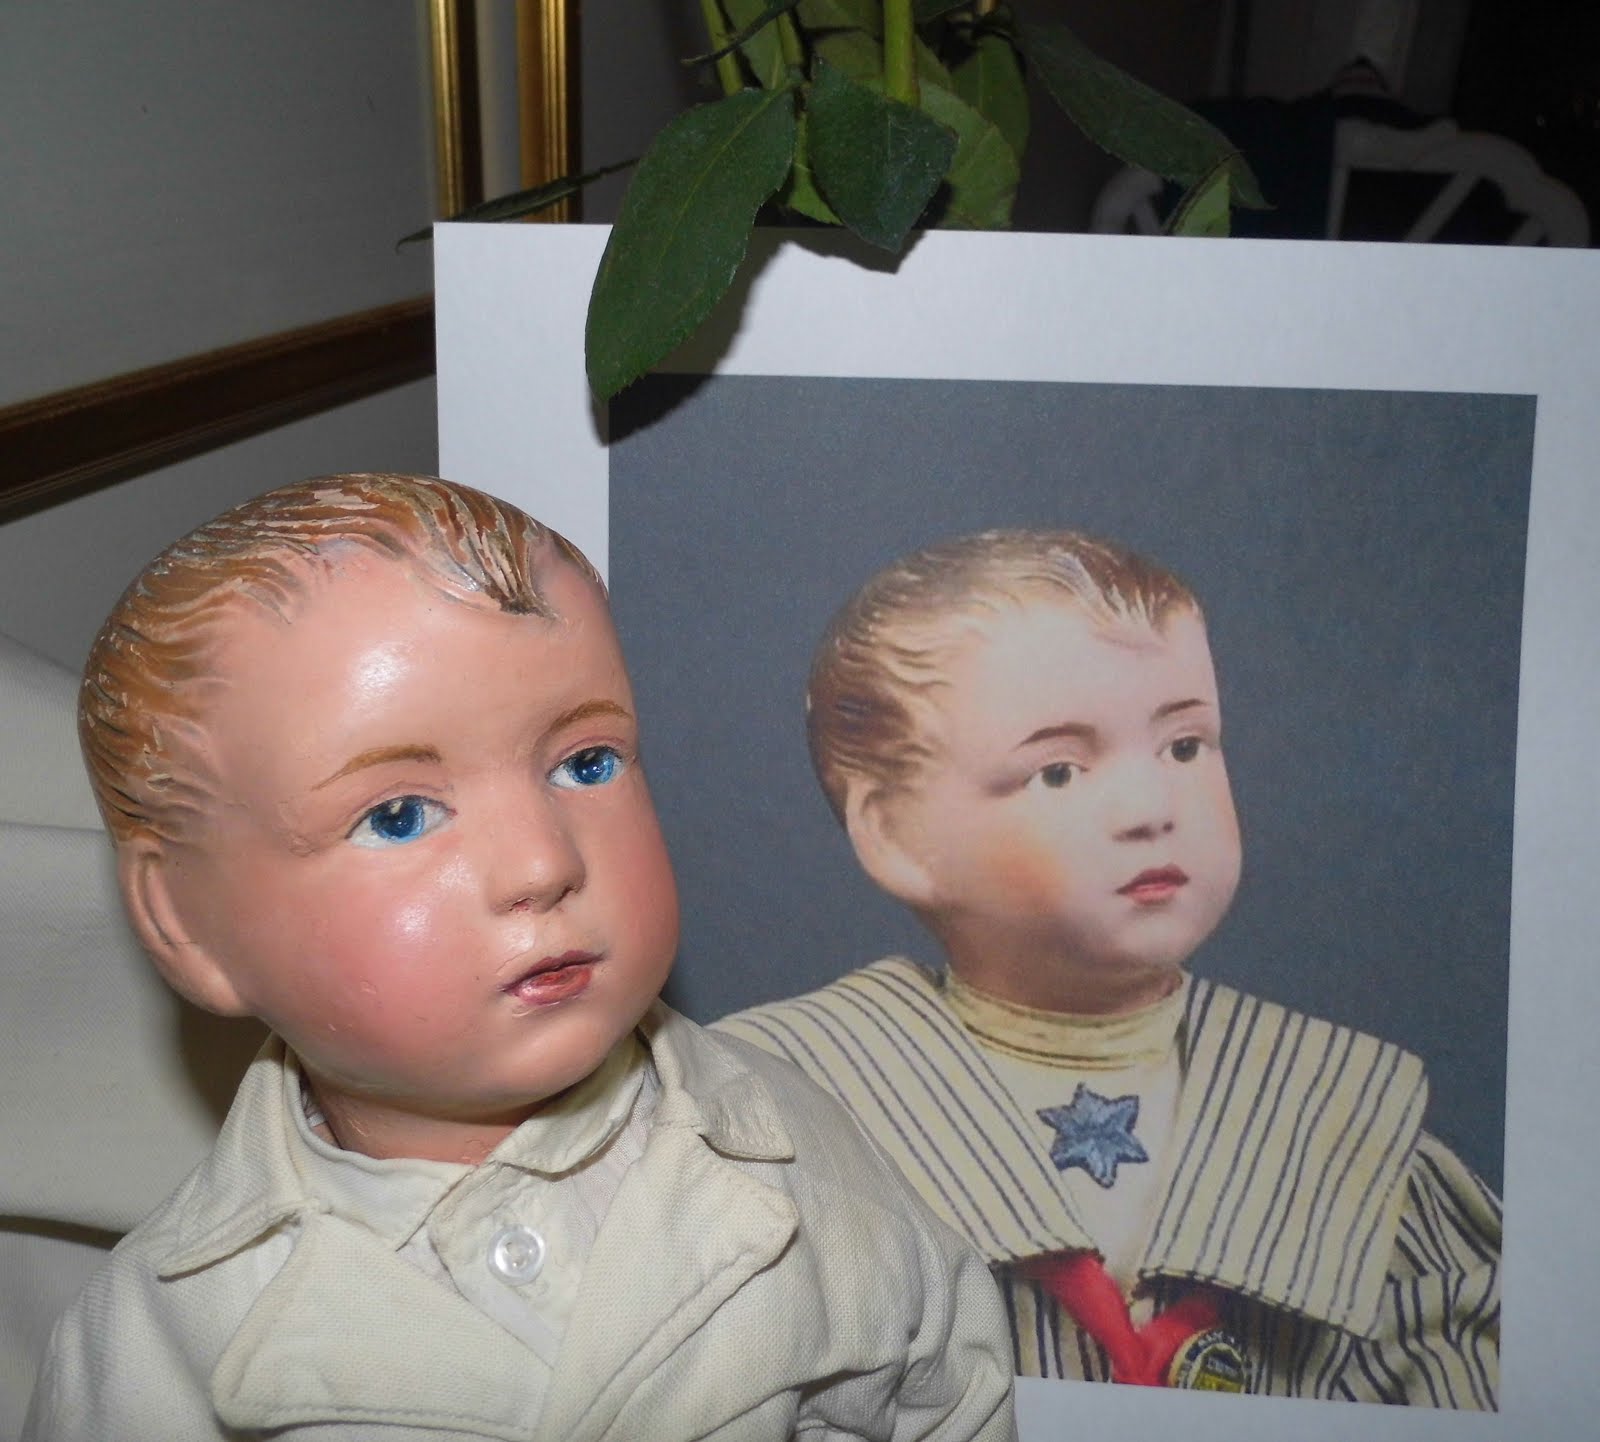
My newest patient is a great little 13 inch Greiner or Greiner-type doll.  Ludwig Greiner was born in Germany and emigrated to the US in the mid-19th century, settling in Philadelphia.  On March 30th 1858 he received his patent for manufacturing Papier Mache dolls.  The dolls were issued with a paper label, but many have lost them and are like this little one. You can see where the label was, but it is not longer there.  


According to Lolly Yokum of Laurel Leaf Studios, who makes Greiner reproductions: 


The paper mache recipe was one pound of white paper cooked and beaten, then add one pound each of dry Spanish whiting and rye flour, then add one ounce of glue... the heads were painted in oil and finished with varnish. This varnish often yellows. Most dolls have dark turquoise blue eyes however a few brown eyed dolls have been seen. Some dolls with glass eyes have been seen as well. The earliest dolls were all brunettes, the blonde haired dolls came later. A variety of hairstyles were made. A few of the later hair styles  have been found with either blonde or brunette hair. If the paper label is missing the dolls can easily be dated by their hairstyle. The doll heads have been found on various cloth bodies. Most of these bodies have leather hands, either white or tan. Some were made by Jacob Lacmann (patent 1871). Since Jacob Lacmann was witness to Greiners will, it seems that the two were well acquainted. Some dolls have cloth legs, while others have a stocking/leather boot combination that is attributed to Mary Steuber (patented in 1878). http://laurelleaf.com/GreinerHistory.htm

I believe this little doll is a Greiner.  I have dealt with a number of Greiners and they have a 'look' as well as the characteristics mentioned above.  You can see the place on the back of her neck where the label was. At least so far as the Greiner dolls I have seen, the tag is always in the same place on the back of the shoulderplate.  


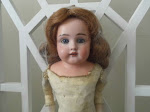
The doll came to me in 'as is' condition with all of her 'issues' (no tip of the nose, missing face paint, one leather arm torn, leather fingers loose, etc), one hundred and fifty years of dirt and all. As I slowly and meticulously picked out the threads and loosened her clothing and removed it - I found one surprise.  I knew the original owner's name was Elsie Jachowskie.  Either Elsie or her daughter - a young lady with the interesting name of Frances Van Winkle - claimed her with a little piece of tape on her shift.  Frances had a sweet little dolly!  


I am going to take time with this doll to document the process of restoration from beginning to end - doll, clothing, and all.  For this blog post I am going to show in photographs the doll's original condition along with what lay beneath and was exposed as I removed the clothing.  Next time I will talk about the process of safely cleaning old doll clothes, with an emphasis on handling their old linen or cloth 'indescribables' or undies.  

Here she is as received - 


And last of all, France's dolly's 'issues':


Missing tip of the nose and face paint, though thank goodness her original eye paint is nearly intact and the lips are there.  Careful restoration with preserve these.


This is where her leather arm detached.  Bits of the leather have remained attached to the cloth body and some of the horsehair stuffing is caught in the threads.


Showing the missing arm. 


Both hands are in roughly the same condition with loose fingers and seams.


The doll's feet have been mended over the years, with boot-like fabric being applied.  I am not sure yet what I will do with this.  I may leave it as it is as the mends were made by the original owner.


That's it for this time.  Check back soon to see more of Frances, the little Greiner's (so named after her proud owner) makeover.

Thursday, February 27, 2014

Five Dollar doll


I found time this week to work on my own project, amazing as that is.  Here are the final photos of the doll I purchased at an estate sale for $5.  She has a sweet little face, doesn't she?  Her costume is not final as this was the only outfit I had in stock that would fit and it is intended for a large baby doll.  I'll run a photo of her again at a later date when she has her new frock!


Saturday, February 15, 2014

ArranBee Nancy repair


This sweet little girl came to me with earlier repairs.  Not to disparage whoever did them, they made a common mistake - making a vintage doll look new.  Also, the detail work was not particularly skillful.  Nancy had other issues - cracks in the composition, a bad split at the back of the head, a missing eyelash, very poorly repaired toes, broken fingers, and on and on.  You could certainly tell she had been loved!  The original owner asked for her dolly to be restored to the shape and look she remembered.  I started off by searching for photos of Arranbee Nancy's so I had an example to follow when restoring the poorly painted hair and face.

Nancy (not the patient) by ArranBee


This is what poor little Nancy looked like when she came to me.


Not too much is needed to say, I suppose.  The photos speak loudly in themselves! 
 
I find one fault of other doll repair artists whose work I end up re-doing is that they often use paint colors 'straight out of the bottle'.  Older dolls have tones which are no longer available, as well as a patina that has aged and altered them.  You have to mix.  It is impossible to use modern paints to achieve a vintage look.  Note the poorly-painted and placed eyebrows; the wrong color of hair.  The too red lips, and the many, many places with missing paint.  If you look closely you will also see that the fingers and toes which were 'restored' are very poorly done.  Comparing them to the way I work, they were left half (if that) finished.
 
Anyhow, all damaged areas were cracked out and an appropriate filler was used to recreate the original skin.  Most of the damage of this type was over the areas where plaster of Paris was used to cement the two halves of the doll's head or body, etc. together.  Plaster of Paris gathers water and caused the skin 'eruptions'.  I sealed it first before adding Nancy's new 'skin'.


Next came the 'fine' work.  Nancy's hair had waves in it.  By cracking out the large area I had to, I eliminated those waves.  I have to rebuild them by using a thinned solution of the filler I used on the legs, head, and other.  It was a process that took at least five layers.


Here she with every part - head, torso, arms, legs, hands, feet and toes all filled, sanded and sealed before painting begins.


Now comes the detailing.  I always use reference photos for this work as I want the doll to look as much like the original as possible.  The photo at the top of this post is of an aged Nancy.  I had others that showed her hair to have been much more solid originally, and that is what I went with - a lovely deep auburn hair tone that really set off her little face. 
 
One interesting note: replacing a vintage doll eyelash.  You can buy old eyes and remove them from the set, but then - of course - you have a one-eyed-lash set left.  I usually make mine from old paintbrushes.  The trouble with this doll was that the old lash was of an odd color and hard in places.  I actually painted and 'aged' the new lash to match as best it could.


And here she is complete and in her original repaired costume. 


Nancy has gone home now, but her little friends - Sonja and Grace - have come to visit the doll hospital.  I may detail their journeys here as well sometime soon.
 

Friday, February 14, 2014

Progress so far


Just a quick post to show the progress so far on last month's ladies.  These two are awaiting their dresses.  


And this is my $5 doll.  Hair and eyes are next.


I managed to squeeze another repair in and will be blogging about it fairly soon.  The 'patient' was a 14 inch ArranBee Nancy composition doll. 

More soon!